Demystifying GD&T Symbols: A Beginner’s Guide
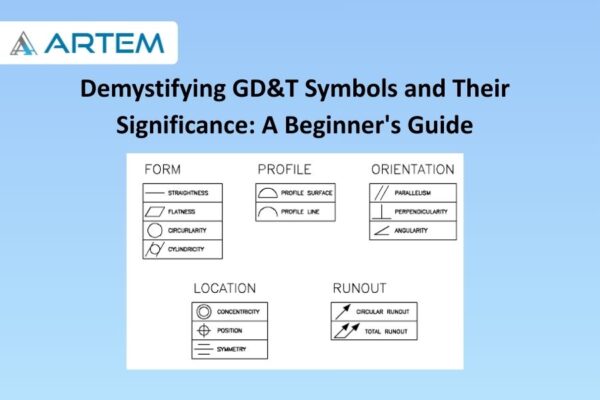
Geometric Dimensioning and Tolerancing (GD&T) employs a unique set of symbols to communicate precise design specifications. Understanding these symbols is fundamental for anyone entering the world of engineering and manufacturing. In this beginner’s guide, we’ll explore the key GD&T symbols along with their characteristics and form-related implications, following the ASME (American Society of Mechanical Engineers) standards.
- Symbol: ⊥ (Perpendicularity)
-
- Characteristic: Perpendicularity ensures that a surface or axis is precisely at a right angle (90 degrees) to a datum reference.
- Form Control: This symbol is applied to features like holes or surfaces, indicating that they must be perpendicular to a specified datum plane.
- Symbol: ∥ (Parallelism)
-
- Characteristic: Parallelism ensures that a surface or axis is precisely parallel to a datum reference.
- Form Control: Applied to features such as surfaces or edges, it indicates that they must maintain a constant distance to a specified datum plane.
- Symbol: ⌀ (Diameter)
-
- Characteristic: Represents the diameter of a cylindrical feature.
- Form Control: Ensures that the cylindrical feature maintains a uniform diameter along its length.
- Symbol: ⌓ (Concentricity)
-
- Characteristic: Concentricity ensures that the center points of two features (like circles) share a common axis.
- Form Control: Applied to features like circles, it ensures that the centers coincide within a specified tolerance zone.
- Symbol: △ (Flatness)
-
- Characteristic: Flatness ensures that a surface is uniformly flat without any waviness or irregularities.
- Form Control: Applied to surfaces, it ensures that the entire surface lies within a specified tolerance zone.
- Symbol: ⨁ (Cylindricity)
-
- Characteristic: Cylindricity ensures that the entire surface of a cylindrical feature is within a specified tolerance zone.
- Form Control: Applied to cylindrical features, it ensures that the entire surface is uniform and does not deviate from a true cylinder.
- Symbol: Ⓧ (Position)
-
- Characteristic: Position establishes the location of a feature’s center point relative to a datum reference.
- Form Control: Applied to features like holes, it ensures that the center point falls within a specified tolerance zone.
- Symbol: ⥱ (Profile of a Line)
-
- Characteristic: Profile controls the shape of a feature along a straight line.
- Form Control: Ensures that the profile of the feature conforms to a specified tolerance zone.
- Symbol: ⭒ (Circularity)
-
- Characteristic: Circularity ensures that the entire circumference of a feature is within a specified tolerance zone.
- Form Control: Applied to circular features, it ensures that the entire circumference is uniform and does not deviate from a true circle.
These fundamental symbols lay the groundwork for effective communication of design specifications through GD&T. As you embark on your GD&T journey, familiarizing yourself with these symbols and their associated characteristics will empower you to create precise engineering drawings and contribute to the development of accurate and efficient manufacturing processes.
This guide, aligned with ASME standards, breaks down key GD&T symbols, their characteristics, and the form controls they impose.
| Symbol | Characteristic | Form Control |
|---|---|---|
| ⊥ (Perpendicularity) | Ensures a surface or axis is precisely at a right angle to a datum reference. | Applies to features like holes or surfaces, indicating they must be perpendicular to a specified datum plane. |
| ∥ (Parallelism) | Ensures a surface or axis is precisely parallel to a datum reference. | Applied to features such as surfaces or edges, indicating they must maintain a constant distance to a specified datum plane. |
| ⌀ (Diameter) | Represents the diameter of a cylindrical feature. | Ensures the cylindrical feature maintains a uniform diameter along its length. |
| ⌓ (Concentricity) | Ensures the center points of two features (like circles) share a common axis. | Applied to features like circles, ensuring the centers coincide within a specified tolerance zone. |
| △ (Flatness) | Ensures a surface is uniformly flat without any waviness or irregularities. | Applied to surfaces, ensuring the entire surface lies within a specified tolerance zone. |
| ⨁ (Cylindricity) | Ensures the entire surface of a cylindrical feature is within a specified tolerance zone. | Applied to cylindrical features, ensuring the entire surface is uniform and doesn’t deviate from a true cylinder. |
| Ⓧ (Position) | Establishes the location of a feature’s center point relative to a datum reference. | Applied to features like holes, ensuring the center point falls within a specified tolerance zone. |
| ⥱ (Profile of a Line) | Controls the shape of a feature along a straight line. | Ensures that the profile of the feature conforms to a specified tolerance zone. |
| ⭒ (Circularity) | Ensures the entire circumference of a feature is within a specified tolerance zone. | Applied to circular features, ensuring the entire circumference is uniform and doesn’t deviate from a true circle. |
Understanding these symbols is a crucial step towards creating accurate engineering drawings and fostering effective communication throughout the manufacturing process. As you venture further into the realm of GD&T, these symbols will empower you to convey precise design intent, ensuring consistency and quality in every engineered component.


